Tropical Leaf Card

Hello crafty friends!
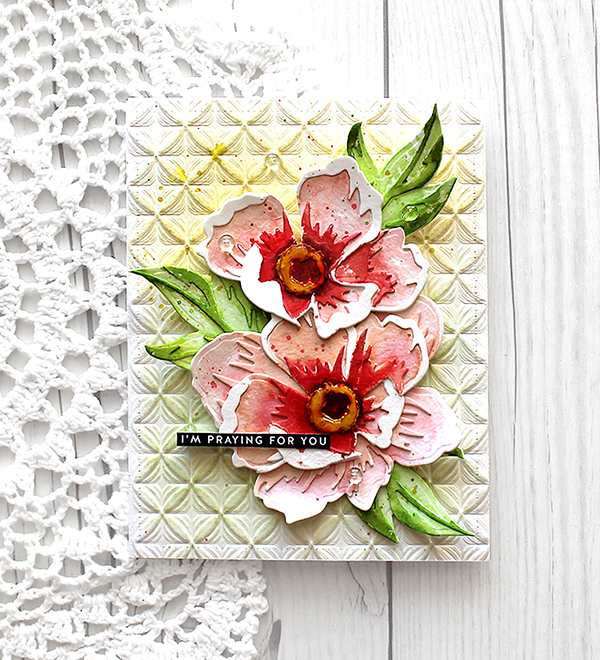
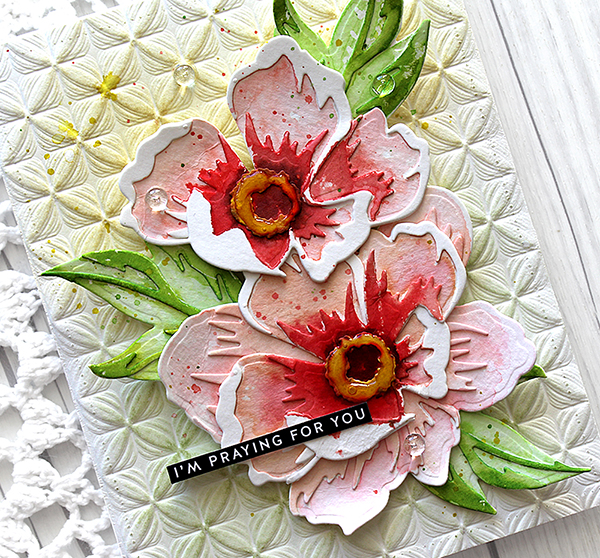
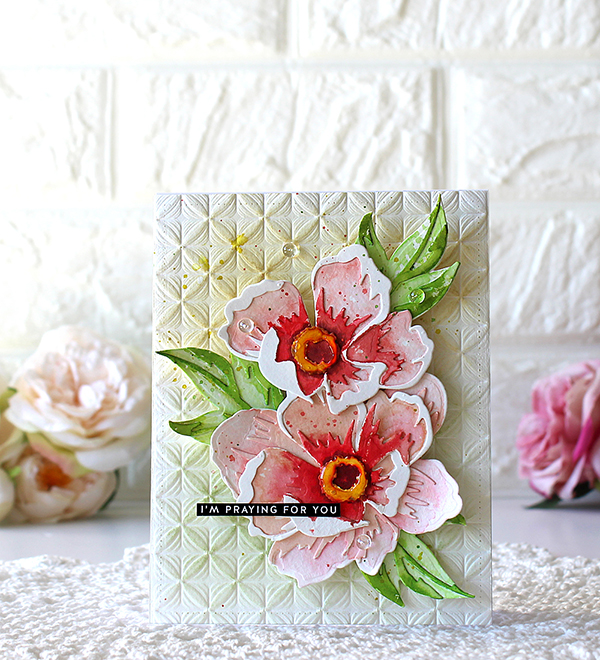
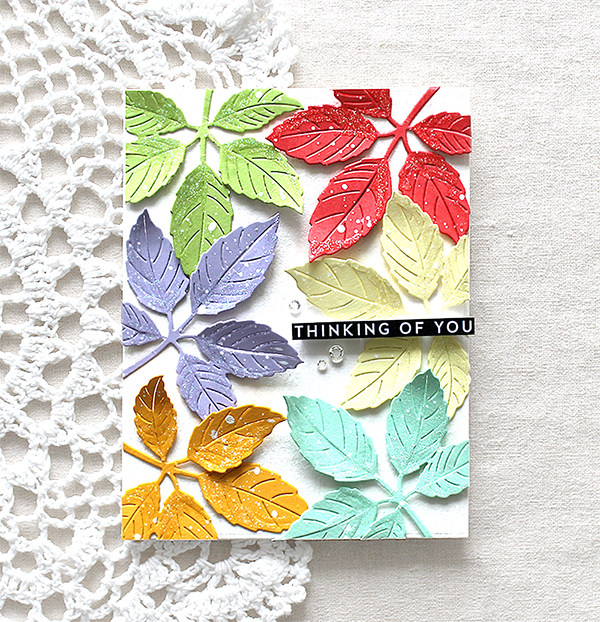
Today I want to share with you my tropical leaf card with Altenew Hibiscus Garden 3D die set. I just used leaf dies in the set.

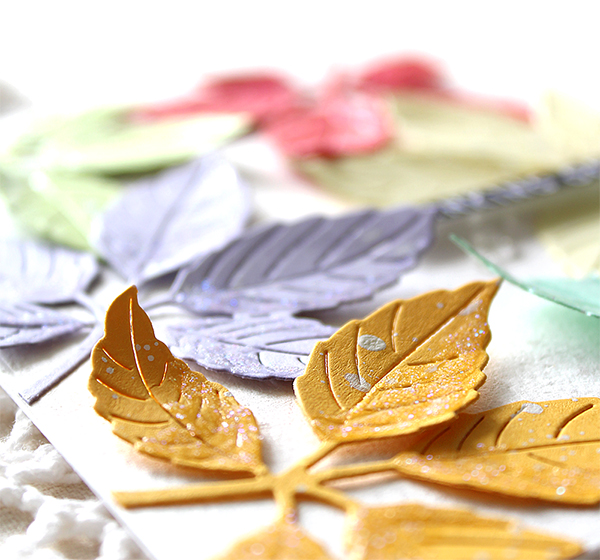
I die cut large leaves from watercolour paper first, then ink blended leaf die cuts with green & blue distress inks. I ink blended the leaf of top-left corner using Bundled Sage & Tea Dye distress inks. For large tropical leaves, I ink blended it with Evergreen Bough, Peacock Feathers and a bit of Pine Needles distress inks. As you know, distress ink reacts with water so, I lightly brushed over the ink with a water brush to lift some of the colour, giving the leaves a watercolour look. I mounted all leaves onto a white card base using foam tape, and then green ink splattered & opaque white ink splattered all over the leafy panel.

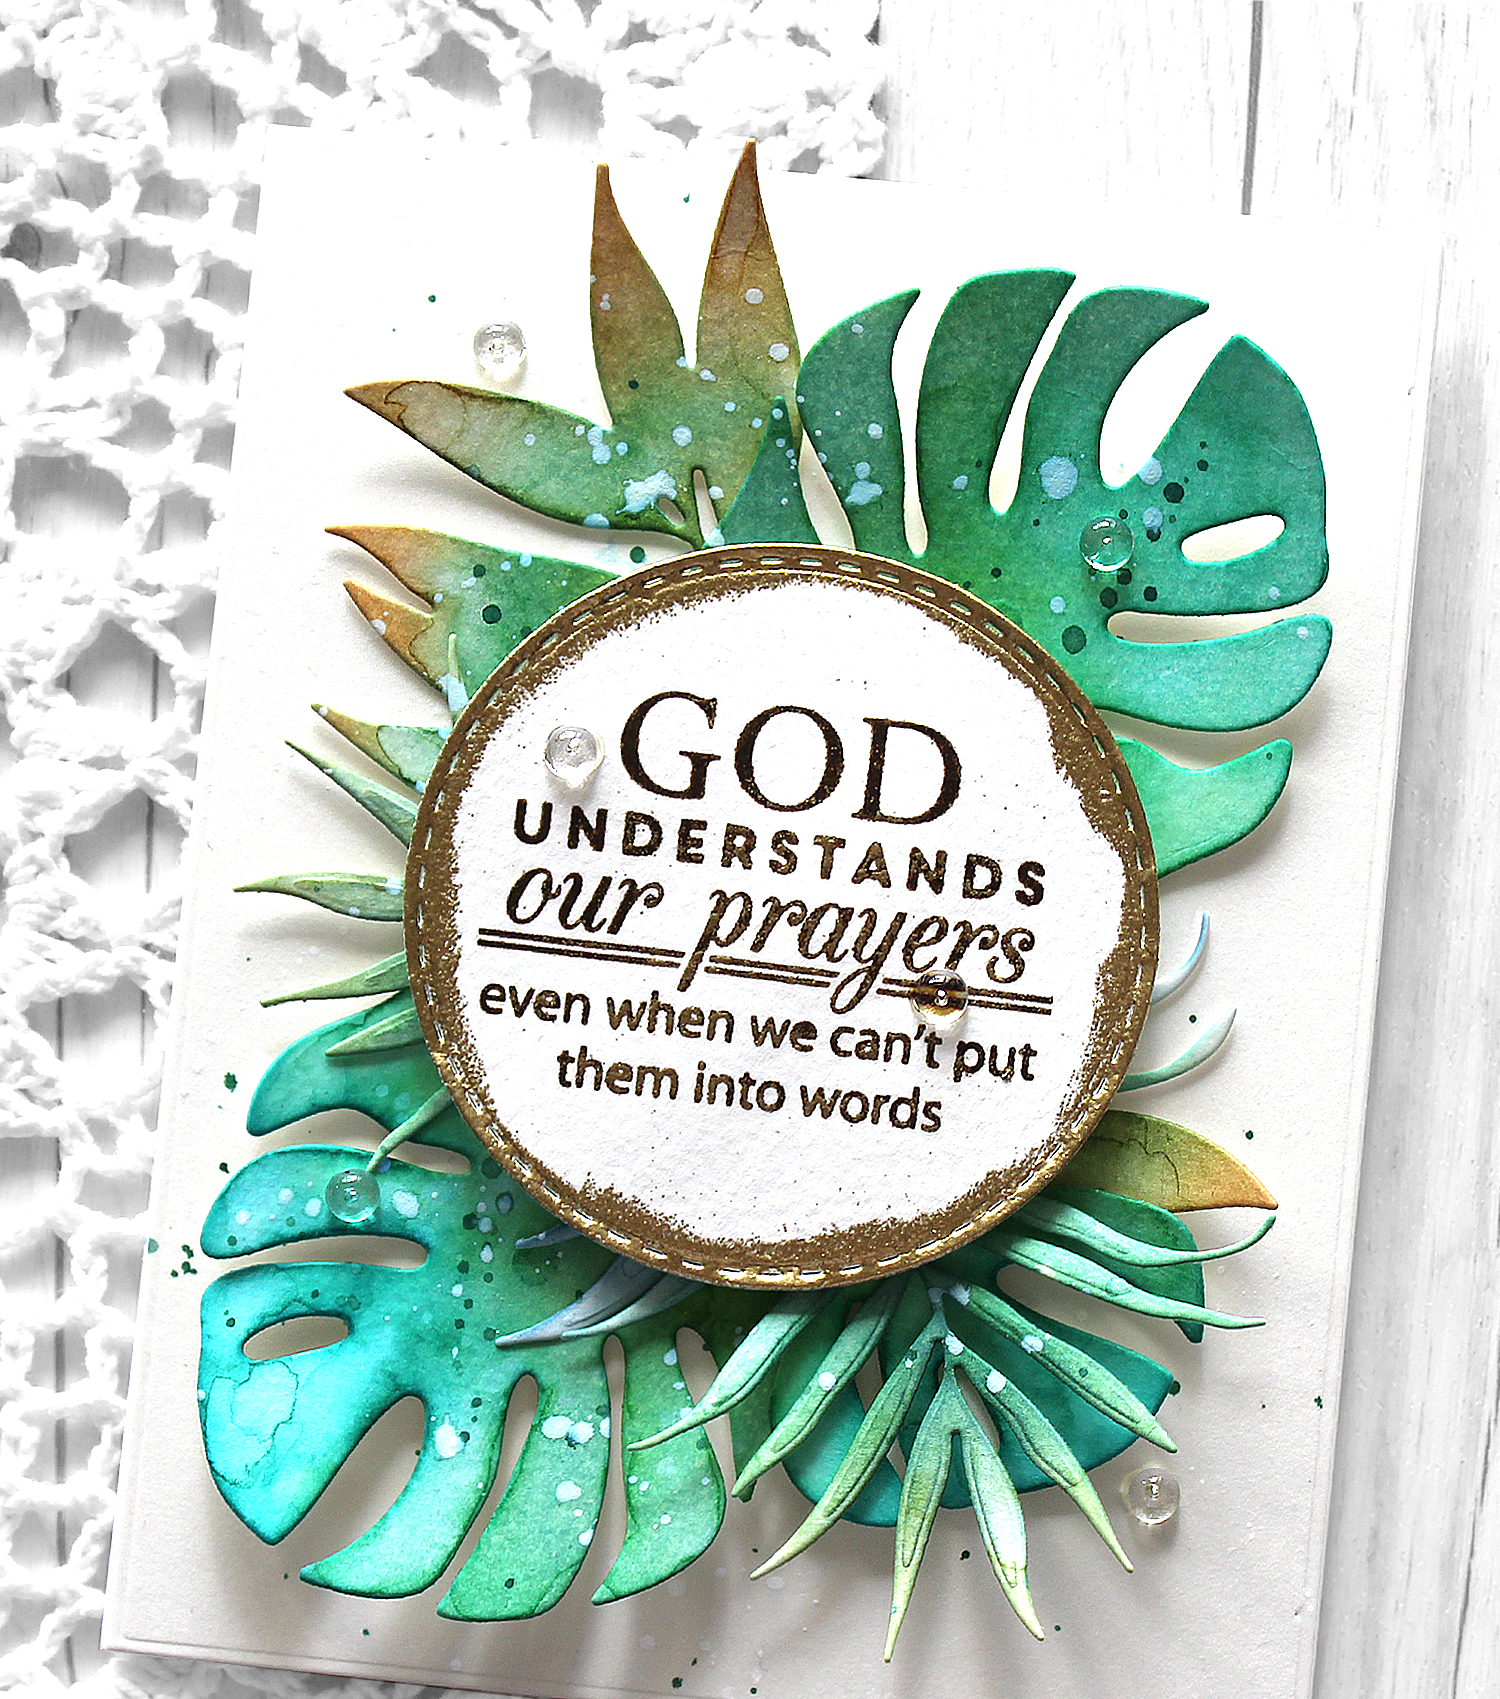
For the sentiment, I stamped the sentiment on a stitched circle panel using Walnut Stain distress ink, then heat embossed the edge of sentiment circle panel with gold. I also decorated around the leaves with PPP 4mm Clear Droplets.


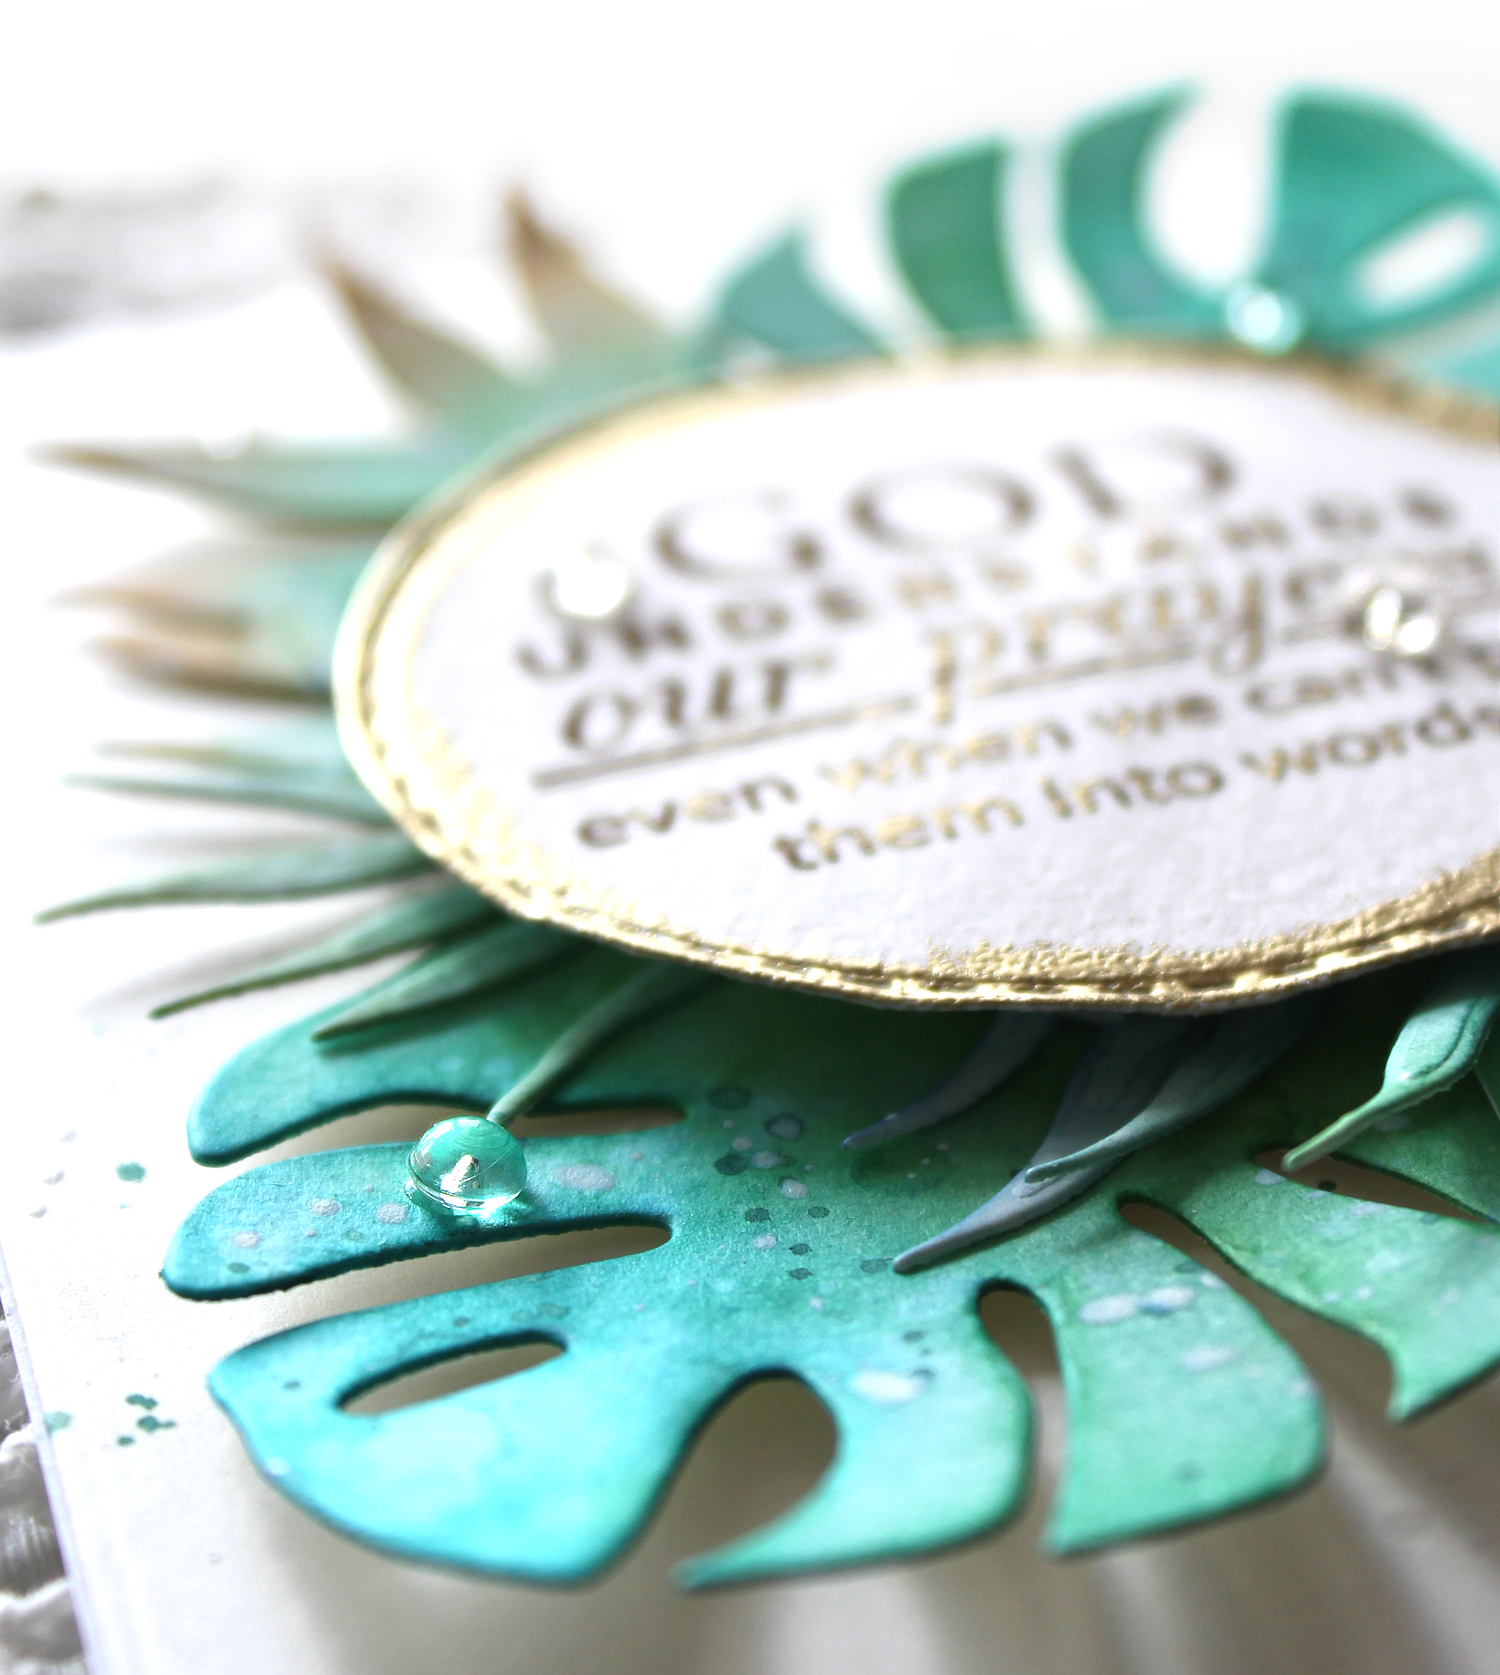
Here in Sydney, Australia, we’re in the midst of autumn heading into winter, but since most countries are entering late spring and approaching summer, I made a card with a refreshing tropical vibe. :D

Thank you so much for stopping by. Have a wonderful day!

Keep smiling and be blessed! God bless you all!
Love Love Love RejoicingCrafts

Peony Dream

Hello crafty friends!
Today I want to share with you a couple of my floral cards with Altenew Peony Dream 3D die set. I have several Altenew layering flower die sets, and without a doubt, they are all truly amazing!

For the first card, I made a watercolour floral card with the Peony Dream die set. I die cut all pieces from watercolour paper first, assembled flowers & leaves using fine tip glue pen. Set aside the assembled flowers and leaves for a moment before watercolouring, I dry embossed a A2 paper panel using SSS Lumen embossing folder, then lightly ink blended it with Scattered Straw & Bundled Sage distress inks. I added same coloured ink splatters as well.

Watercolouring time!! Of course, I have other watercolour supplies, but when I make cards, I habitually use distress inks or reinkers. For this peonies, I used Tattered Rose, Barn Door, Vintage Photo and Scattered Straw for petals, Bundled Sage and Mowed Lawn for leaves. I didn’t forget to add clear droplets on the card – Pretty Pink Posh 4mm clear droplets are also an essential in my floral cards. When I place these clear droplets on the flowers, it feels as if the paper flowers might come to life like real ones. :D


Here is another floral card with Peony Dream die set.

I made five petals and four leaves using coloured cardstock. I die cut the pieces and assembled them using fine tip glue pen. And then, decorated all petals & leaves around the sentiment banner. I used Neenah Smooth Desert Storm cardstock as my card base.

“GOD understands our prayers even when we can’t put them into words.” – isn’t it beautiful? When my heart is so heavy that I can’t even say, this phrase is truly comforting.

Thank you so much for stopping by. Have a wonderful day!

Keep smiling and be blessed! God bless you all!
Love Love Love RejoicingCrafts

SSS STAMPtember® 2023 Blog Party!!

Hello crafty friends, happy STAMPtember 2023!
Can you believe fall is already everywhere (not in Australia, though)? As many of you already know, September is the best month for cardmaking and even we have the month-long STAMPtember festival! Today we have a huge STAMPtember Party with lots and lots of super talented card makers. I am SO SUPER excited and honoured to be a part of this awesome party. YAY!!

I made a couple of butterfly cards for this amazing party today! I used brand new Layered Cosmic Butterfly die, Intersection Lines Background stamp and Cue the Confetti stamp set.

For my first card, I made a butterfly birthday card. For the background panel, I heat embossed Intersection Lines Background on watercolour paper panel with white embossing powder, lightly applied some pale coloured distress inks (Tattered Rose, Antique Linen, Tea Dye). For the butterflies, I die cut two butterfly sets from white cardstock using the Layered Cosmic Butterfly die, blended them with warm coloured Pawsitively Saturated inks as below:
Pink butterfly: Rose & Sherbet / Purple butterfly: Citrine & Amethyst.
For the sentiment, I used the Cue the Confetti stamp set.


Here is another butterfly card with the Layered Cosmic Butterfly die.

I simply die cut all elements, butterflies and tiny flowers, from white & coloured cardstock and arranged them on A2 sized white card using foam tape. It’s so easy to make, right? :)


SPECIAL PROMOTION!!

It would be no fun if there’s no gift at the party, right?!! We have a special promotion for YOU! Get a FREE exclusive Fireworks Embossing Folder at checkout when you purchase $30 or more at Simon Says Stamp Store.

Redeem your FREE GIFT in 3 easy steps!
1. Search sf338 in the store
2. Add 1 to your card
3. Enter code FWEF at chechout to get this item for free!*

Thank you so much for stopping by. Have a wonderful day!

Keep smiling and be blessed! God bless you all!
Love Love Love RejoicingCrafts

SSS Hugs and Kisses Release Blog Hop – Day 2

Hello crafty friends, happy weekend!
Welcome to Day 2 of the Simon Says Stamp Hugs and Kisses Release Blog Hop. I am so happy to be a part of this beautiful blog hop! If you arrived here from super talented Miriam Prantner’s blog you are on the right track.

For my first card, I used the From the Heart Messages, Nested Round Hearts and Lace Heart Kaleidoscope Background. I heat embossed the beautiful sentiment in the From the Heart Messages set onto white cardstock in white, die cut it with the largest sized heart die, and then ink blended it with Festive Berries & Fired Brick Distress inks. For the background, I stamped the Lace Heart Kaleidoscope using Memento Tuxedo Black dye ink. I coloured all tiny hearts with Copic R27.


Here is another heart card with the From the Heart Messages and Nested Round Hearts. I die cut 4 different hearts from colour cardstock – I used Rich Red Matte Metallic, Cotton Candy and Lipstick Red cardstock. For the sentiment heart die cut, I heat embossed the sentiment on watercolour paper in white, inked it with Tattered Rose Distress ink.

For the background, I used the Spun Glass embossing folder.


For my last card, I used the Large Stitched Maple die. This maple die is not belong to the Hugs and Kisses Release but I thought, I really don’t know, it was one of the new products, haha! More card, happy to see, right?!!

I die cut the Large Stitched Maple from pastel coloured cardstock, randomly adhered them on an A2 sized white card base using foam tape. Easy-peasy, right?! :)


GIVEAWAY & BLOG HOP EXCLUSIVE PROMOTION!

Simon Says Stamp is giving away a $25 coupon to every stop on the hop. The winners will be chosen over the weekend and post on Simon Says Stamp blog on Wednesday the 25th of January. ONE MORE! Get a FREE End of the Rainbow Stamp Set with the code RBW23 (This promotion will expire 1/22 at 11:59 pm EST) at checkout when you purchase at Simon Says Stamp Store.

BLOG HOP LIST:
Simon Says Stamp Blog
Nina-Marie Trapani
Caly Person
Debby Hughes
Amy Rysavy
Suzy Plantamura
Lisa Addesa
Bibi Cameron
Miriam Prantner
Yoonsun Hur (Me!!)
Barb Engler
Heather Hoffman
Dilay Nacar
Jean Doeringsfeld
Kim Hamilton
Lorraine Aquilina


Be sure to see what other ladies are sharing today. I’m sure you really love them all!

Keep smiling and be blessed! God bless you all!
Love Love Love RejoicingCrafts


SSS Hugs to YOU!

Hello crafty friends!
HAPPY NEW YEAR 2023!!
I am so happy to share with you my cards again. I probably can’t make a card often due to my busy full time job, but I plan to share mine steadily!! :)

For my first card, I used the Simon Says Stamp Stained Glass Heart die along with other SSS goodies. I dry embossed an A2 sized white paper panel with the new Spun Glass embossing folder, and then decorated the panel with 2mm white pearls. I just wanted to make a classic and elegant look. I die cut the Stained Glass Heart from ETC Paper Rainbow Assortment Glitter Paper – I used glitter white, rose gold and magenta colours. I also die cut the Olive Leaves from thick white cardstock.

I mounted the white panel on white card base using Dot Runner Adhesive first, and then added glitter heart on the centre of the card using Pawsitively Perfect White Foam Tape. Tiny flowers & leaves on the centre of the heart, applied them with Nuvo Jewel Drops.


For my second card, I used the A Glazing Day stamp set – there are lots of yummy doughnuts in one set! I randomly stamped them with Memento Tuxedo Black, coloured all stamped images with Copic markers.

I decorated on all doughnuts with Nuvo White Blizzard Glitter, Morning Dew Crystal Drops and cute PPP Clay Confetti.

Thank you so much for stopping by. Have a great day.

Keep smiling and be blessed! God bless you all!
Love Love Love RejoicingCrafts