SSS Rainbow Butterflies

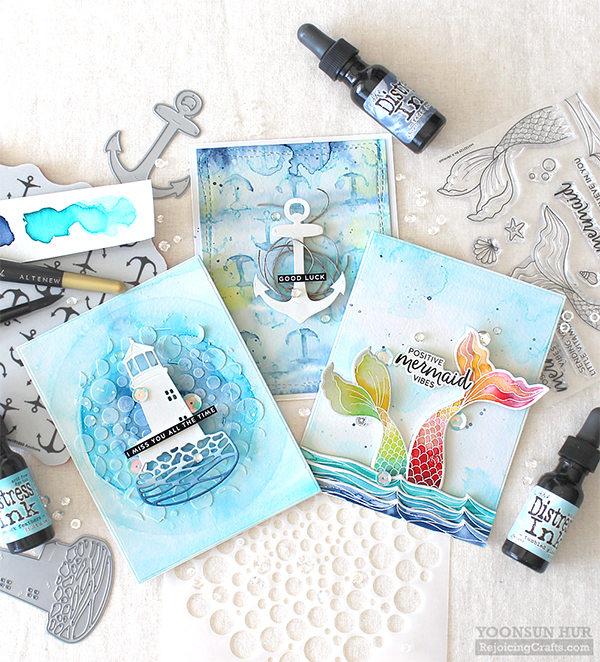
Hello crafty friends! Hope you are having a good weekend.
Today I have 3 rainbow coloured butterfly cards with some Simon Says Stamp goodies.


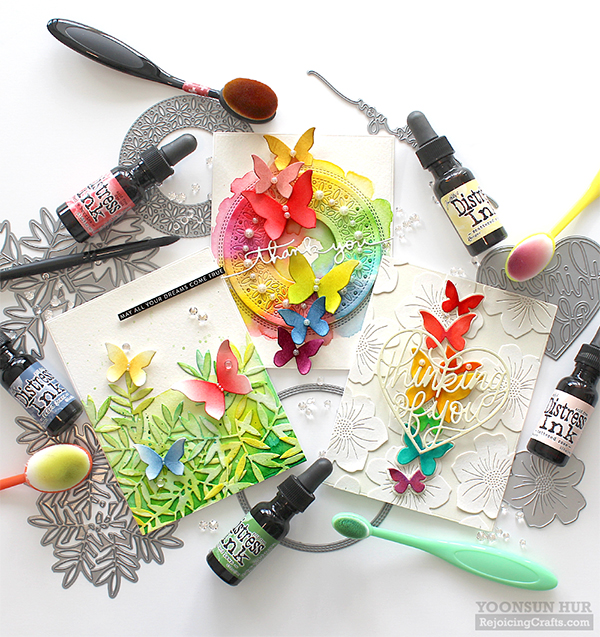
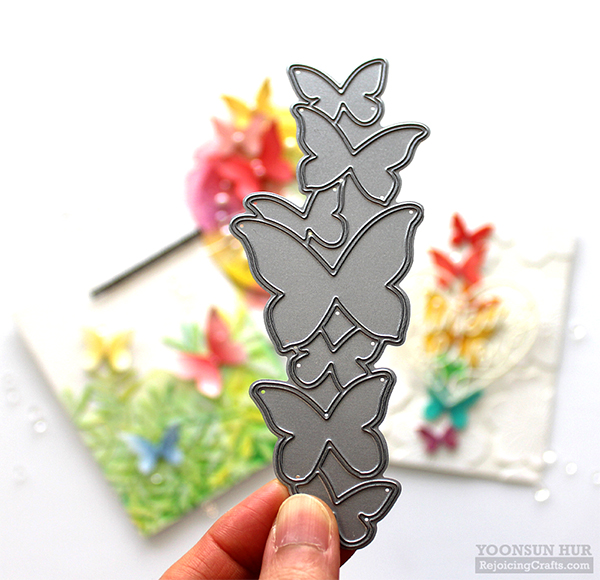
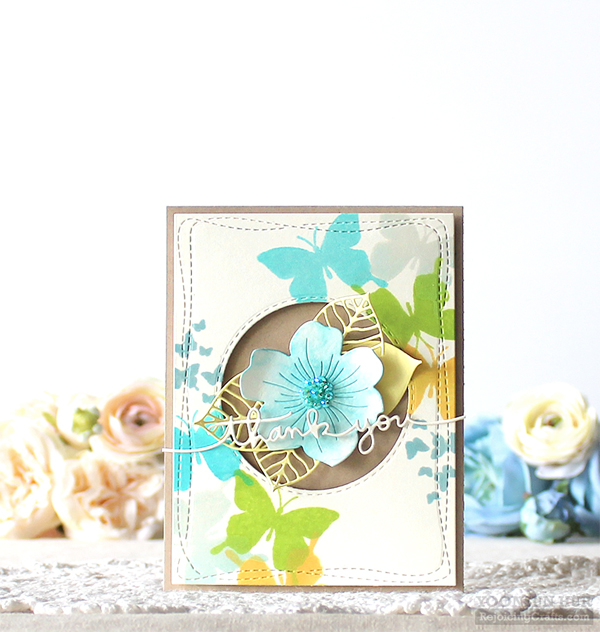
To-da! This Butterfly Drift die is my main supply – it’s definitely my most favourite butterfly die ever!!


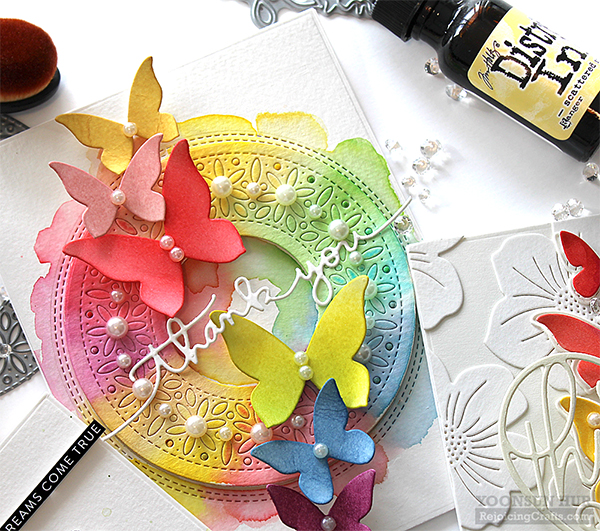
For my first card, I made a watercoloured rainbow butterflies using the Butterfly Drift and the Shimmer Wreath dies. I die cut rectangle panel from watercolour paper using the A2 sized Basic Rectangle die first. I then die cut the centre of the panel using the Shimmer Wreath die. I watercoloured to a floral circle part of the panel as shown in the picture using Distress reinkers in rainbow order. Next, I die cut the Butterfly Drift from watercolour paper, and then applied Distress inks to some butterflies using blending brushes. For the sentiment, I used the word “Thank you” in the Handlettered Greetings die set.

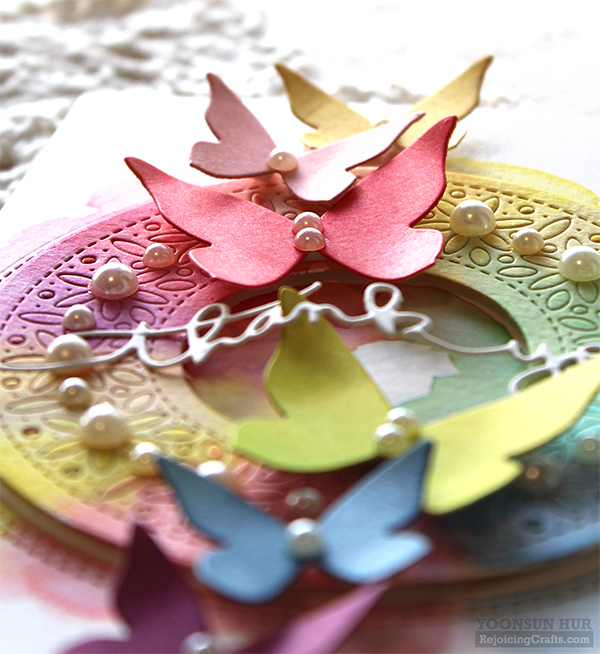
I decorated the card with cream coloured pearls.


For my second card, I made a tone-on-tone floral background with the Cosmos Bloom die first. I die cut several Cosmos Bloom from white cardstock, then adhered them on white card base as shown in the picture.

I die cut the Butterfly Drift from thick white cardstock, then coloured each butterfly die cut with Copic markers:
Red: R24 / Pink: R22 / Orange: YR14 / Yellow: Y15
Green: YG06 / Blue: BG13 / Purple: R85 & V15.
I added the outlined Butterfly Drift die cut on the centre of the card first, then added Copic coloured butterflies in place using foam tape. For the sentiment, I used the Thinking of You Heart die.


For my last card today, I made a watercoloured leafy background with the Leafy Christmas Tree die set. With Crushed Olive & Mowed Lawn Distress inks, I coloured to the panel & leafy tree die cuts. I die cut the Butterfly Drift from white cardstock, inked them, then added on the card.

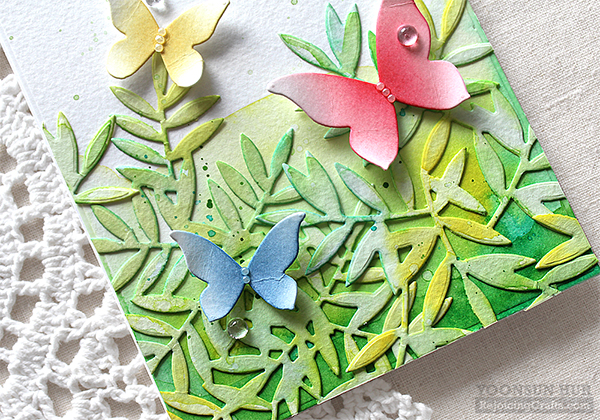
I really hope my rainbow butterfly cards make you happy!

Thank you so much for stopping by. Have a safe and restful weekend!

Keep smiling and be blessed. God bless you all.
Love Love Love RejoicingCrafts

SSS Ocean Background

Hello crafty friends! Hope you are having a happy weekend.
Today I have three ocean-themed cards with some Simon Says Stamp goodies.

I made watercoloured ocean backgrounds with Tumbled Glass, Peacock Feathers and Faded Jeans Distress reinkers – I loooove this blue combo!!


So many crafty friends love my Mermaid 3D standing card I made last month so I used the Be A Mermaid set once again. :D

To make watercoloured ocean background, I fixed the edge of the watercolour paper with purple tape first. I then applied water to the paper before watercolouring. I lightly coloured with Tumbled Glass Distress reinker, then added blue ink splatters. Once it was dry, I trimmed it using A2 sized Basic Rectangle die.

I heat embossed mermaid tails & waves from the Be A Mermaid set in white, coloured them with Distress inks, and then die cut them with the matching dies:
Red mermaid tail: (from bottom to top) Victorian Velvet, Festive Berries, Tattered Rose and Fossilized Amber
Green mermaid tail: Peacock Feathers, Mowed Lawn, Crushed Olive and Fossilized Amber.
I mounted them on white card base, decorated the card with April Showers sequins and Clear Droplets.


For my second card, I used the Anchor die & the Anchors Background stamp. I made watercoloured sea background using Tumbled Glass, Crushed Olive, Peacock Feathers and Faded Jeans Distress reinkers. Once it was dry, I trimmed it using the Wonky Rectangle die. I applied Tumbled Glass Distress ink to the Anchors Background stamp, stamped onto watercoloured panel, then lightly touched the stamped images using water brush. For the centre of the card, I die cut the Anchor from thick white cardstock, wrapped it using natural twine, adhered it using foam tape.


For my last card today, I used the Lighthouse die & the In The Round stencil. To give the wave effect, I used the Circle Masks Stencil set. I placed the circle stencils onto A2 sized watercolour paper panel, then lightly traced circles using pencil in the order of small to large sized circle. I then coloured according to circle lines using Faded Jeans, Peacock Feathers and Tumbled Glass Distress reinkers.


To express breaking waves, I laid the In The Round stencil onto watercolour panel, and then applied white embossing paste. :D


YAY!! You can now get 20% off all Simon branded products until tomorrow!! The code is HPY4TH. Please grab awesome Simon products and share your amazing cards! ;)

Thank you so much for stopping by. Have a safe and restful weekend!

Keep smiling and be blessed. God bless you all.
Love Love Love RejoicingCrafts

PPP June 2021 Product Release Blog Hop

Hello crafty friends!
Welcome to Day 3 of the Pretty Pink Posh June 2021 Product Release Blog Hop. If you arrived here from the super talented Jeanne Jachna’s blog you are on the right track.


For my first card, I used the new Vacation Scene die & the Layered Surfboards stencils – this combo is really for summer cards!! I die cut all pieces in the Vacation Scene die set from colour cardstock and assembled them like a puzzle!


For this blue surfboards background, I laid the first stencil, surfboard shape only, on an A2 watercolour paper panel in secure, applied Tumbled Glass Distress ink using blending brush. I changed the second stencil, detailed one, on the same place, applied Mermaid Lagoon & Crushed Olive Distress inks. As you know, Distress inks react with water so, I added water drops all over the panel for the effect of splashing water in the beach. ;) For the sentiment, I used the Summer Drinks set.


For my second card, I made a fun beach scene using the new Summer Fun set and the Stitched Waves die set. I stamped & Copic coloured adorable critters, die cut them with the coordinating dies.

I die cut the waves from kraft & watercolour paper using the new Stitched Waves die set. With 3 watercolour die cuts, I ink blended them with Mermaid Lagoon & Faded Jeans Distress inks. I mounted all waves onto A2 card base as shown in the picture, then tucked coloured critters in between the waves. Making summer cards are so much fun!

BLOG HOP LIST:
Pretty Pink Posh blog
Rachel Alvarado
Mona Toth
Ardyth Percy- Robb
Dana Kirby
Jeanne Jachna
Yoonsun Hur (Me!!)

Thank you so much for stopping by. Have a great day!

Keep smiling and be blessed. God bless you all.
Love Love Love RejoicingCrafts

SSS Rainbows Release Blog Hop – Day 2

Hello crafty friends, happy weekend!
Welcome to Day 2 of the Simon Says Stamp Rainbows Release Blog Hop. I’m so delighted to be a part of this amazing blog hop! If you arrived here from super talented Keisha Charles’s blog you are on the right track.


Today I’m focusing on the new 3D Card Die Set – it is really awesome die!!


I started by die cutting 2 pieces of large panel from SSS Cream cardstock using the 3D Card dies – there are score lines on each panel.


I folded in using bone folder along the score lines.

I taped those sides as shown in the picture – I did both panels.


I prepared 2.75″ (W) x 5.5″ (H) main panel to show images & sentiments, decorated it, and then put it to the bottom edge as shown in the picture.


Ta-da! We can easily make a 3D stand card. It. Is. So. COOL!!


For this card, I used the Be A Mermaid set & the Scallop Borders dies. I die cut several waves from coloured cardstock (see the supply list below) in (kind of) rainbow order using the largest scallop borders in the Scallop Borders die set. I then stamped & Copic coloured two beautiful mermaid tails from the Be A Mermaid set. I die cut them with the matching dies. I put all elements as shown in the picture onto 2.75 X 5.5″ white panel using double-sided tape.


For my second 3D card. I made a rainbow coloured background using some Distress Oxide ink – I used the Fired Brick, Fossilized Amber, Broken China and Wilted Violet to blend the panel. I then dry embossed the panel with the Roseville Bouquet embossing folder, took out the colours from flower areas. I added rainbow & sentiment on the bottom of the panel.

We can flatten the 3D card and put it in an A2 sized envelope!


For my last card for the hop today, I made blue floral card with the Roseville Bouquet embossing folder. I simply applied Roseville Bouquet embossing folder onto SSS Cornflower Blue cardstock, trimmed the panel using the Wonky Rectangle die, and then coloured some parts with white & green Faber-Castell polychromos colored pencils. For the sentiment, I used the With All My Heart die.


GIVEAWAY & BLOG HOP EXCLUSIVE PROMOTION!

Simon Says Stamp is giving away a $25 coupon to every stop on the hop. The winners will be chosen over the weekend and post on Simon Says Stamp blog on Wednesday, the 9th of June. ONE MORE! Get a FREE pack of Holographic envelopes with the code ENVIES (This promotion will expire 6/6 at 11:59 pm EDT) at checkout when you purchase at Simon Says Stamp Store.

BLOG HOP LIST:
Simon Says Stamp Blog
Debby Hughes
Laura Bassen
Jennifer McGuire
Heather Hoffman
Anna-Karin Evaldsson
Bibi Cameron
Keisha Charles
Yoonsun Hur (Me!!)
Vicky Papaioannou
Mindy Eggen
Koren Wiskman
Norine Borys
Tina Smith
Natasha Vacca
Adelle Emery

Enjoy this Rainbows Blog Hop and happy crafting!!

Keep smiling and be blessed! God bless you all!
Love Love Love RejoicingCrafts

SSS Butterfly Kisses

Hello crafty friends!
Today’s cards feature the Butterfly Kisses stamp set along with other SSS goodies. Butterflies and flowers are the best combination for a beautiful card, right?!!

For my first card, I started by making butterflies background with warm-toned dye inks – Rosie Cheeks, Rose Apple, Lavender and Duckling. I then trimmed the edge of the stamped panel down using the Wonky Rectangle die.

For the centre of the card, I added pinkish hydrangea using Hydrangea Petals die – sadly, it’s retired so if you don’t have, you can use any other flower dies.

I die cut several petals from watercolour paper, blended on each petal with Worn Lipstick Distress ink, then gently brushed them with water as shown in the picture. For the pale yellow leaves, I used the detailed leaf die in the Detailed Rose die set. I added pink jewels on the centre of each petals after assembling flower.

Here is one more card with the Butterfly Kisses stamp set. I stamped solid butterfly images on white panel with cool-toned dye inks – Surf Blue, Audrey Blue, Winter Sky, Green Apple and Duckling. For the centre of the card, I die cut the Cosmos Bloom from watercolour paper, applied Mermaid Lagoon Distress ink, and then brushed it using water brush.

For the sentiment, I used the word “Thank you” in the Handlettered Greetings die set.


Thank you so much for stopping by. Have a healthy and happy week!

Keep smiling and be blessed! God bless you all!
Love Love Love RejoicingCrafts