MFT July Die-namics Design – Rise to the Occasion

Hello crafty friends!
Welcome to My Favorite Things July Die-namics Design! This month’s theme is Rise to the Occasion.
MFT-DienamicsDesignJoin us for this month’s Die-namics Design as we go up, up, and away with projects featuring balloon Die-namics. Patterned, painted, textured, and peek-a-boo – so many fun embellishing options with this iconic image that just says party. Celebrate with us, won’t you?

Here is what I came up with:
YoonsunHur-20150724-MFT-DD01
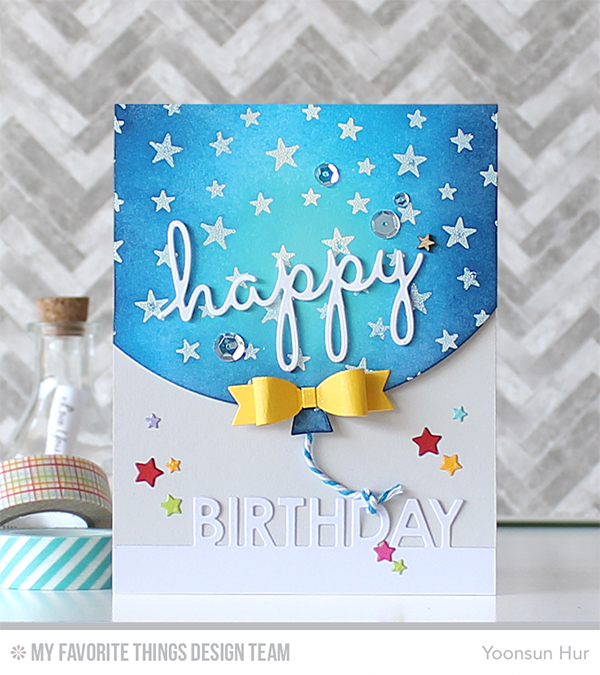
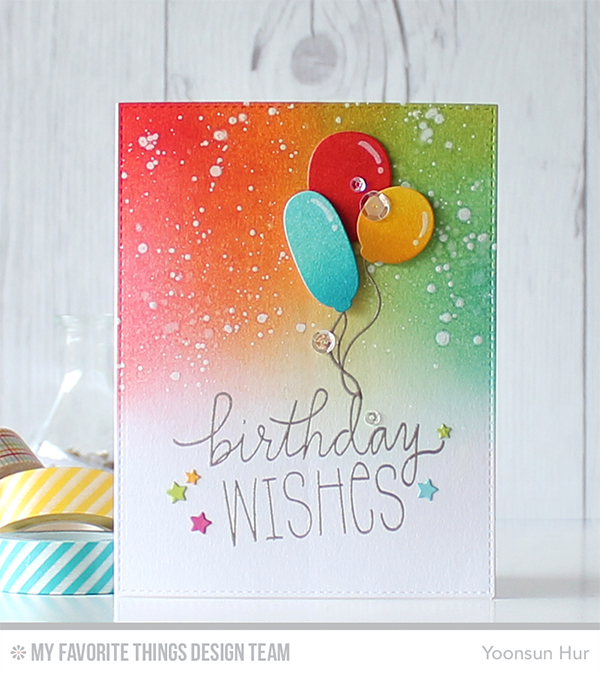
To create the card, I 1) Blended on the top portion of the watercolour panel with Wild Cherry, Tickled Pink, Lemon Drop, Sour Apple, Summer Splash dye inks using mini blending tool, added white ink splatters. 2) Trimmed the inked panel with Blueprints 25 Die-namics. 3) Inked on the watercolour paper with dye inks, die cut balloons with Birthday Wishes & Balloons Die-namics. 4) Stamped the sentiment from the Birthday Wishes & Balloons Stamp Set on the bottom portion of the inked panel using embossing ink, heat embossed with Ranger Liquid Platinum embossing powder. 5) Mounted all elements as shown to the card base.
YoonsunHur-20150724-MFT-DD02

Make sure to head over to the MFT blog today for more great projects from the design team for this months Die-namics Design.

Thank you so much for stopping by. Have a wonderful day!!

Keep smiling and be blessed! God bless you all!
Love Love Love RejoicingCrafts

MFT Summer School Session 2 – Monochromatic

Hello crafty friends, TGIF!
Today is the last day of MFT summer school session 2. The topic of the day is ‘Monochromatic‘.
PrintA monochromatic colour scheme is created by taking any one of the twelve hues from the basic colour wheel and repeating it in various shades and tones. This scheme looks clean and elegant and very easy on the eyes, especially with blue or green hues.

Here is what I came up with:
YoonsunHur-20150717-MFT-Monochromatic01
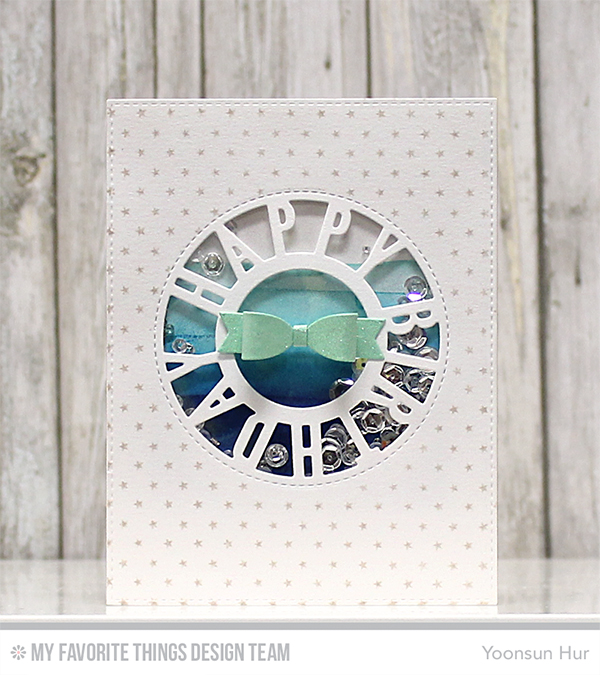
To create the card, I 1) Prepared a circle mask die cut, the same size as the Birthday Centerpieces Die-namics, and used mask die cut to adhere it to the centre of the white panel. 2) Stamped Tiny Stars Background on the white panel using Grout Gray dye ink. 3) Took off the mask die cut and die cut happy birthday circle from the stamped panel using Birthday Centerpieces Die-namics. 4) For the inside of the circle window, I coloured on the watercolour paper with After Midnight, Lush Lagoon, Summer Splash dye inks using a wet paintbrush. and then adhered it to the card base, added some clear sequins & beads. 5) Placed the circle window panel on top to finish it off.
YoonsunHur-20150717-MFT-Monochromatic02YoonsunHur-20150717-MFT-Monochromatic03
PrintMake sure to head over to the MFT blog today for more great projects from the MFT design team members.

Thank you so much for stopping by. Have a wonderful weekend!

Keep smiling and be blessed! God bless you all!
Love Love Love RejoicingCrafts

MFT Summer School Session 2 – Complementary

Hello crafty friends, welcome back to MFT Summer School!
In MFT summer school session 2, we are dealing with color theory. The topic of the day is ‘Complementary‘.
Print
Complementary colours are any two colours which are directly opposite each other, such as red & green, orange & blue, purple & yellow. These opposing colours create maximum contrast and maximum stability.

For my first card, I take purple & yellow colour palettes.
YoonsunHur-20150714-MFT-PromoSS01
To create the card, 1)I stamped Roses All Over Background on the white card stock using Pure Plum dye ink. 2)I die cut butterflies from vellum paper using Flutter of Butterflies Solid Die-namics, from Daffodil card stock using Flutter of Butterflies Lace Die-namics. 3)I die cut ‘Wish’ from Pure Plum card stock using Stars & Wishes Die-namics. 4)I mounted all elements as shown to the Daffodil card stock, added some clear sequins.
YoonsunHur-20150714-MFT-PromoSS02
For my second card, I take blue & orange colour palettes.
YoonsunHur-20150714-MFT-PromoSS03
Blue and orange colour combination wasn’t familiar with me before but, I realised these two colours can make a really cool card!!

To create the card, 1)I stamped Tiny Stars Background on the white card stock using Coral Crush hybrid ink, die cut the left edge using Blueprints 25 Die-namics. 2)I die cut ‘happy’ from Orange Zest card stock, ‘birthday’ from After Midnight card stock using Arrow Greetings Die-namics. I also die cut the balloons from Orange Zest, After Midnight card stocks using Birthday Balloons Die-namics. 3)To finish it off, I mounted all elements as shown to the stamped panel.

Print
Make sure to head over to the MFT blog today for more great projects from the MFT design team members.

Thank you so much for stopping by. Have a wonderful day!

Keep smiling and be blessed! God bless you all!
Love Love Love RejoicingCrafts

MFT July Release – New Product Launch

Hello crafty friends!
Welcome to the My Favorite Things new product launch! FINALLY!! All of the new products we’ve been sharing all week are officially available in the MFT Boutique now! I can’t wait to see what you guys create with them :D
NewProductLaunch
My cards showcase Piece of Cake Stamp Set and Star Celebration Background.
YoonsunHur-MFT-20150707-NPL01For my first card, I used Piece of Cake Stamp Set. This set has many humorous birthday sentiments :D I randomly stamped cakes, candles using hybrid inks, trimmed the stamped panel using Blueprints 25 Die-namics. I then stamped the sentiment with Black Licorice hybrid ink, added some clear sequins.
YoonsunHur-MFT-20150707-NPL02
I am sharing this card with you again!
YoonsunHur-MFT-20150703-Day5-03For the big blue balloon, 1)I stamped Star Celebration Background Stamp onto the white card stock using embossing ink, white heat embossed. Who could resist this darling balloon? ;)
YoonsunHur-MFT-20150703-Day5-04

GIVEAWAY ALERT!
Don’t forget to check out the MFT blog to see all of the amazing projects the creative team has created. You can leave a comment on all of the designer’s New Product Launch posts for a chance to WIN one of two $100 gift vouchers!

Thank you so much for stopping by. Happy crafting!!

Keep smiling and be blessed! God bless you all!
Love Love Love RejoicingCrafts

Totally Awesome

Hello folks! I just want to share my cards with Hero Arts Totally Stamp set -it is definitely one of my favourite stamp set!!

My first card here:
20150109-STAR-EN-01
20150109-STAR-P01

Originally there are several building silhouettes in one stamp but, I wanted to stamp each with different colours. So, I cut and made 5 separate building stamps lol! I then used some post-it notes to mask the building images to stamp them overlapping.

20150109-STAR-EN-10I stamped buildings with several Simon Says Stamp dye inks from the bottom of the panel. I love, love, love all different coloured buildings!

20150109-STAR-EN-03
My second card called ‘Nightscape’
20150109-STAR-EN-04Imagine the city lights at night… What a romantic it is! Totally Awesome!!

20150109-STAR-EN-05

To create the background inside the window, I blended several Distress inks -Tumbled Glass, Peacock Feathers, Faded Jeans, and Seedless Preserves- using blending tool and spritzed a bit of water, Prima Bloom Pearl White, and Studio Calico Opaque White.

20150109-STAR-EN-06

My last card called ‘Watercolour Mist’
20150109-STAR-EN-07To create the background, I drew the circle lines in rainbow order, and blended the colours using detailer waterbrush. It is quite easy watercolour technique :D
20150109-STAR-EN-09

Woohoo!! I had so much fun with them. Thank you so much for stopping by.

★ Supplies:
Hero Arts Totally Stamp set
Hero Arts Shadow Inks
Simon Says Stamp Dye Inks
Distress Inks
Faber Castell Watercolour Pencils
Tim Holtz Detailer Waterbrush
Tsukineko VersaFine Pigment Inkpad – Onyx Black
Hero Arts Embossing Powder – Clear
VersaMark Embossing Ink Pad
Ranger Embossing Powder – Super Fine Gold
Studio Calico Mister Huey’s Opaque White
Prima Bloom Spray Mist Pearl White

Keep smiling and be blessed! God bless you all!
Love Love Love RejoicingCrafts

Signature-Bottom